Make AWS Deployments Fun Again

I have worked on a bunch of different AWS projects over the past few years. I focus on deployment and automation. Naturally CDK became quite a powerful tool for me. While every project was different, some requirements kept repeating. Me being me, I created some open-source tools to help me with those repeating requirements so I can write less code in my next project.

Self-Hosted Runners for GitHub Actions

AWS has CodeBuild, CodePipeline, and even CodeCommit (for now). But most projects I worked on preferred GitHub Actions for the nicer UI, well integrated features, and out-of-the-box usability. Eventually most needed a way to use self-hosted runners inside AWS to access some internal database, due to security concerns, or simply because they are using GitHub Enterprise Server. After having to spend a few days trying to get actions-runner-controller on k8s due to a documentation bug, I broke down and created my own solution.

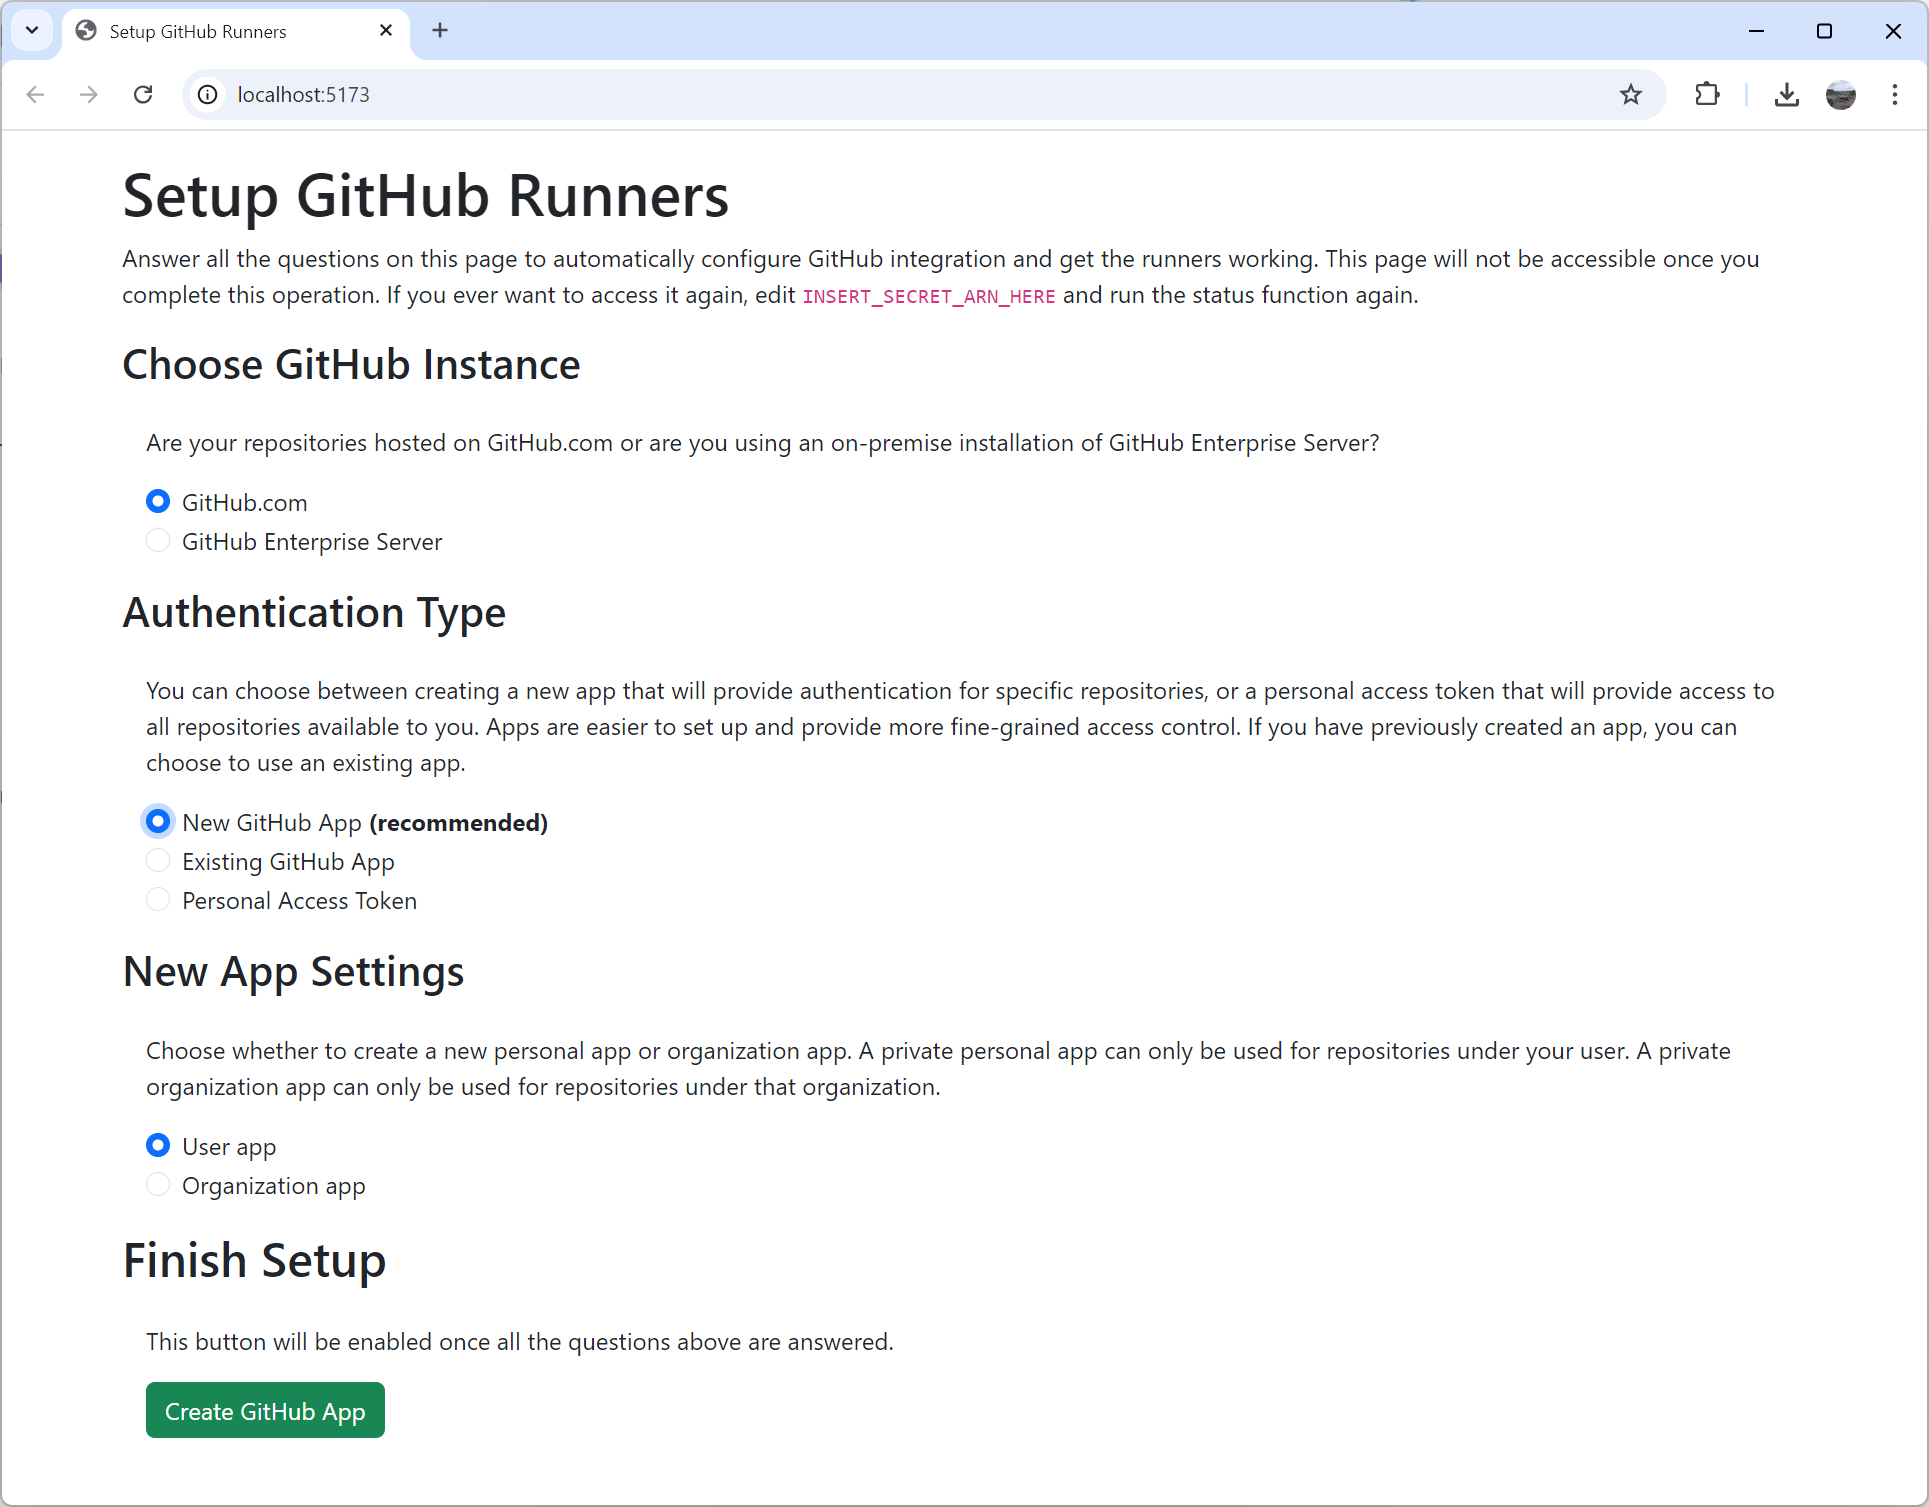
I created cdk-github-runners. I had fun playing with new AWS features, but mostly focused on making it as easy to install as possible. It deploys in a few minutes with the default configuration. After deployment you end up with a fancy browser-based setup wizard. It even uses app manifests to create the GitHub app automatically. This means there is zero room for errors with secrets because you don’t have to copy around multiple random keys and tokens. And then to top it all off, there is a solid API to customize the runner image and add dependencies or configuration. It can create on-demand runners for you on EC2, ECS, Fargate, CodeBuild and even Lambda (because why not?). Runner images are built in AWS itself so you don’t need to wait hours for it to build and upload from your computer. Refreshed images are built on a schedule so you are always up-to-date.

Of all the various open-source tools I’ve worked on over the years, this one has been the most popular so far, second only to NSIS. People want their self-hosted runners. I believe most of the popularity is thanks to Corey Quinn of Last Week in AWS mentioning the tool in his talks. You should hear him talk about it, but I’ll just say he lived up to his name with the architecture of his setup. He even invited me to his podcast to talk about open-source which was a lot of fun.

Turbo-Charging Deployments

No one likes long deployment times. And when working on a laptop, long and resource heavy build processes are even worse. Whenever CDK starts Docker to bundle assets locally, I know it’s time for a coffee break. This is why I created cdk-turbo-layers and used it in every project where Python Lambdas have dependencies. Instead of cooking my poor laptop, it bundles the dependencies in Lambda or CodeBuild on AWS and attaches them as a layer to my functions. The usual CDK process downloads dependencies, installs them, bundles them, and then uploads them right back. But with turbo layers there is no downloading, definitely no uploading, and bundling only happens when dependencies change. Finally CDK only uploads the code itself and absolutely never touches dependencies locally. You can uninstall Docker.

This tool uses the exact same trick I used with Lovage (blog post) and serverless-python-requirements (blog post). While turbo layers got a bit more stars than its ancestors, it’s still not very popular. People really hate layers. And they do have some good reasons. But this tool does the trick for me. I can deploy my projects way faster without Docker cooking my lap.

Just in case you’re curious about the details, all it does is create a custom resource that does the bundling on AWS itself. It creates a Lambda function that runs pip install, zips the result up, uploads it to S3, and returns the hash. A layer is then created based on the result of the custom resource and attached to the function. There is a lot more fluff around it to support different package managers, and provide additional debugging information for the eventual packaging failure. But at the heart of it is just a custom resource call pip install.

Standalone SOCI Indexer for Speed

In the same theme of speeding things up, I have been excited about AWS announcing SOCI support. Lazy loading Docker images for shorter container boot times? Yes please. This is immediately useful in every project I’ve worked on. But while being excited about the technology, I was disappointed to try and fail running it. The basic snapshotter that indexes images so they can use SOCI has some heavy dependencies. I believe it was running containerd on CodeBuild that broke my spirit. I decided to fork their Lambda variant of the snapshotter and create standalone-soci-indexer.

This tool runs anywhere and requires nothing. It doesn’t even require Docker. It can handle arm64 images on x64 and x64 images on arm64. It even almost runs on Windows (gzip binding is missing). It is completely standalone and impossible to install wrong as it’s just one executable. Download it, run it, and you got yourself a SOCI index. Done.

Implementing Automatic Safe Hands-off Deployment in AWS

One of my clients asked me to implement the solution Clare Liguori of AWS described in Automating safe, hands-off deployments. It’s a very interesting and detailed document describing how Amazon deploys code to production with no human interaction. It describes safe continuous delivery in cloud scale that minimizes developers interaction and failure points. When combined with AWS Well-Architected principals, it shows you the way to build a multi-tenant SaaS product made of multiple services over multiple regions and multiple accounts that follows all best practices, is easy to maintain and easy to develop. AWS provides the principals, but the implementation details vary and depend on the specific product requirements.

In this blog post I will describe how I architected and implemented this solution for one of my clients. They wanted to move their on-premise product to a SaaS offering in the cloud that can scale to millions of transactions a second. A key requirement was being able to easily deploy multiple environments in multiple regions over multiple accounts to accommodate for the security pillar, service limits, and scalability.

Read More »

Avoiding CDK Pipelines Support Stacks

If you ever used CDK Pipelines to deploy stacks cross-region, you’ve probably come across support stacks. CodePipeline automatically creates stacks named <PipelineStackName>-support-<region> that contain a bucket and sometimes a key. The buckets these stacks create are used by CodePipeline to replicate artifacts across regions for deployment.

As you add more and more pipelines to your project, the number of these stacks and the buckets they leave behind because they don’t use autoDeleteObjects can get daunting. The artifact bucket for the pipeline itself even has removalPolicy: RemovalPolicy.RETAIN. These stacks are deployed to other regions, so it’s also very easy to forget about them when you delete the pipeline stack. Avoiding these stacks is straightforward, but does take a bit of work and understanding.

CodePipeline documentation covers the basic steps, but there are a couple more for CDK Pipelines.

One-time Setup

  1. Create a bucket for each region where stacks are deployed.
  2. Set bucket policy to allow other accounts to read it.
  3. Create a KMS key for each region (might be optional if not using cross-account deployment)
  4. Set key policy to allow other accounts to decrypt using it.

Here is sample Python code:

try:
    import aws_cdk.core as core  # CDK 1
except ImportError:
    import aws_cdk as core  # CDK 2
from aws_cdk import aws_iam as iam
from aws_cdk import aws_kms as kms
from aws_cdk import aws_s3 as s3

app = core.App()
for region in ["us-east-1", "us-west-1", "eu-west-1"]:
    artifact_stack = core.Stack(
        app,
        f"common-pipeline-support-{region}",
        env=core.Environment(
            account="123456789",
            region=region,
        ),
    )
    key = kms.Key(
        artifact_stack,
        "Replication Key",
        removal_policy=core.RemovalPolicy.DESTROY,
    )
    key_alias = kms.Alias(
        artifact_stack,
        "Replication Key Alias",
        alias_name=core.PhysicalName.GENERATE_IF_NEEDED,  # helps using the object directly
        target_key=key,
        removal_policy=core.RemovalPolicy.DESTROY,
    )
    bucket = s3.Bucket(
        artifact_stack,
        "Replication Bucket",
        bucket_name=core.PhysicalName.GENERATE_IF_NEEDED,  # helps using the object directly
        encryption_key=key_alias,
        auto_delete_objects=True,
        removal_policy=core.RemovalPolicy.DESTROY,
    )

    for target_account in ["22222222222", "33333333333"]:
        bucket.grant_read(iam.AccountPrincipal(target_account))
        key.grant_decrypt(iam.AccountPrincipal(target_account))

CDK Pipeline Setup

  1. Create a codepipeline.Pipeline object:
    • If you’re deploying stacks cross-account, set crossAcountKeys: true for the pipeline.
  2. Pass the Pipeline object in CDK CodePipeline’s codePipeline argument.

Here is sample Python code:

try:
    import aws_cdk.core as core  # CDK 1
except ImportError:
    import aws_cdk as core  # CDK 2
from aws_cdk import aws_codepipeline as codepipeline
from aws_cdk import aws_kms as kms
from aws_cdk import aws_s3 as s3
from aws_cdk import pipelines

app = core.App()
pipeline_stack = core.Stack(app, "pipeline-stack")
pipeline = codepipeline.Pipeline(
    pipeline_stack,
    "Pipeline",
    cross_region_replication_buckets={
        region: s3.Bucket.from_bucket_attributes(
            pipeline_stack,
            f"Bucket {region}",
            bucket_name="insert bucket name here",
            encryption_key=kms.Key.from_key_arn(
                pipeline_stack,
                f"Key {region}",
                key_arn="insert key arn here",
            )
        )
        for region in ["us-east-1", "us-west-1", "eu-west-1"]
    },
    cross_account_keys=True,
    restart_execution_on_update=True,
)
cdk_pipeline = pipelines.CodePipeline(
    pipeline_stack,
    "CDK Pipeline",
    code_pipeline=pipeline,
    # ... other settings here ...
)

Tying it Together

The missing piece from the pipeline code above is how it gets the bucket and key names. That depends on how your code is laid out. If everything is in one project, you can create the support stacks in that same project and access the objects in them. That’s what PhysicalName.GENERATE_IF_NEEDED is for.

If the project that creates the buckets is separate from the pipeline project, or if there are many different pipeline projects, you can write the bucket and key names into a central location. For example, it can be written into SSM parameter. Or if your project is small enough, you can even hardcode them.

Another option to try out is cdk-remote-stack that lets you easily “import” values from the support stacks you created even though they are in a different region.

Conclusion

CDK makes life easy by creating CodePipeline replications buckets for you using support stacks. But sometimes it’s better to do things yourself to get a less cluttered CloudFormation and S3 resource list. Avoid the mess by creating the replication buckets yourself and reuse them with every pipeline.