Confronted with lack of budget for proper security tooling, I decided to just create my own. We occasionally ran Prowler manually. The results were mostly ignored. There was no ownership tracking, no history, no breakdown by account or team, and no good way to correlate findings over time.
Basically the standard “we technically do security scans” setup.
So I built something myself.
The actual application itself is honestly not that interesting. It’s mostly a CRUD app written in Go and HTMX. It handles the usual things.
Launch and schedule scans
Store and display findings
Track ownership
Send Slack notifications
Group findings by team/account/repository
Show some basic graphs
The interesting part was the security model around the scanners themselves. Because the more I worked on it, the more I realized something uncomfortable: the scanners were actually some of the highest risk components in the entire environment.
Think about what these tools normally get:
Unrestricted read access to AWS accounts
Unrestricted read access to repositories
Full internet access
CI/CD integration
Permissions to pull arbitrary images and dependencies
A few years ago, I needed periodic rotation for MongoDB Atlas API keys. We had a pretty well established CDK project with linting, cdk-nag, diffs on PRs, automatic deployments on merge to main, the works. Everything was reasonably locked down with least privilege, backups, automatically rotating secrets, hardened containers, and the kitchen sink. So obviously when adding MongoDB Atlas to the mix, I wanted to apply the same principles and build secure automated deployment with CDK.
Luckily for me, MongoDB Atlas has CloudFormation resources and even a CDK library. A lot of the resources are L1, but it’s better than creating custom resources for everything. Creating an API key is something along the lines of:
This takes care of creating the API key and writing it into a secret. It’s not exactly the usual CDK pattern where the secret is created but its value needs to be filled later outside of the deployment. It’s actually pretty nice, since one command can do it all including taking care of rollbacks and everything.
But there was still one problem. I wanted periodic API key rotation. For security. Of course…
I have worked on a bunch of different AWS projects over the past few years. I focus on deployment and automation. Naturally CDK became quite a powerful tool for me. While every project was different, some requirements kept repeating. Me being me, I created some open-source tools to help me with those repeating requirements so I can write less code in my next project.
Self-Hosted Runners for GitHub Actions
AWS has CodeBuild, CodePipeline, and even CodeCommit (for now). But most projects I worked on preferred GitHub Actions for the nicer UI, well integrated features, and out-of-the-box usability. Eventually most needed a way to use self-hosted runners inside AWS to access some internal database, due to security concerns, or simply because they are using GitHub Enterprise Server. After having to spend a few days trying to get actions-runner-controller on k8s due to a documentation bug, I broke down and created my own solution.
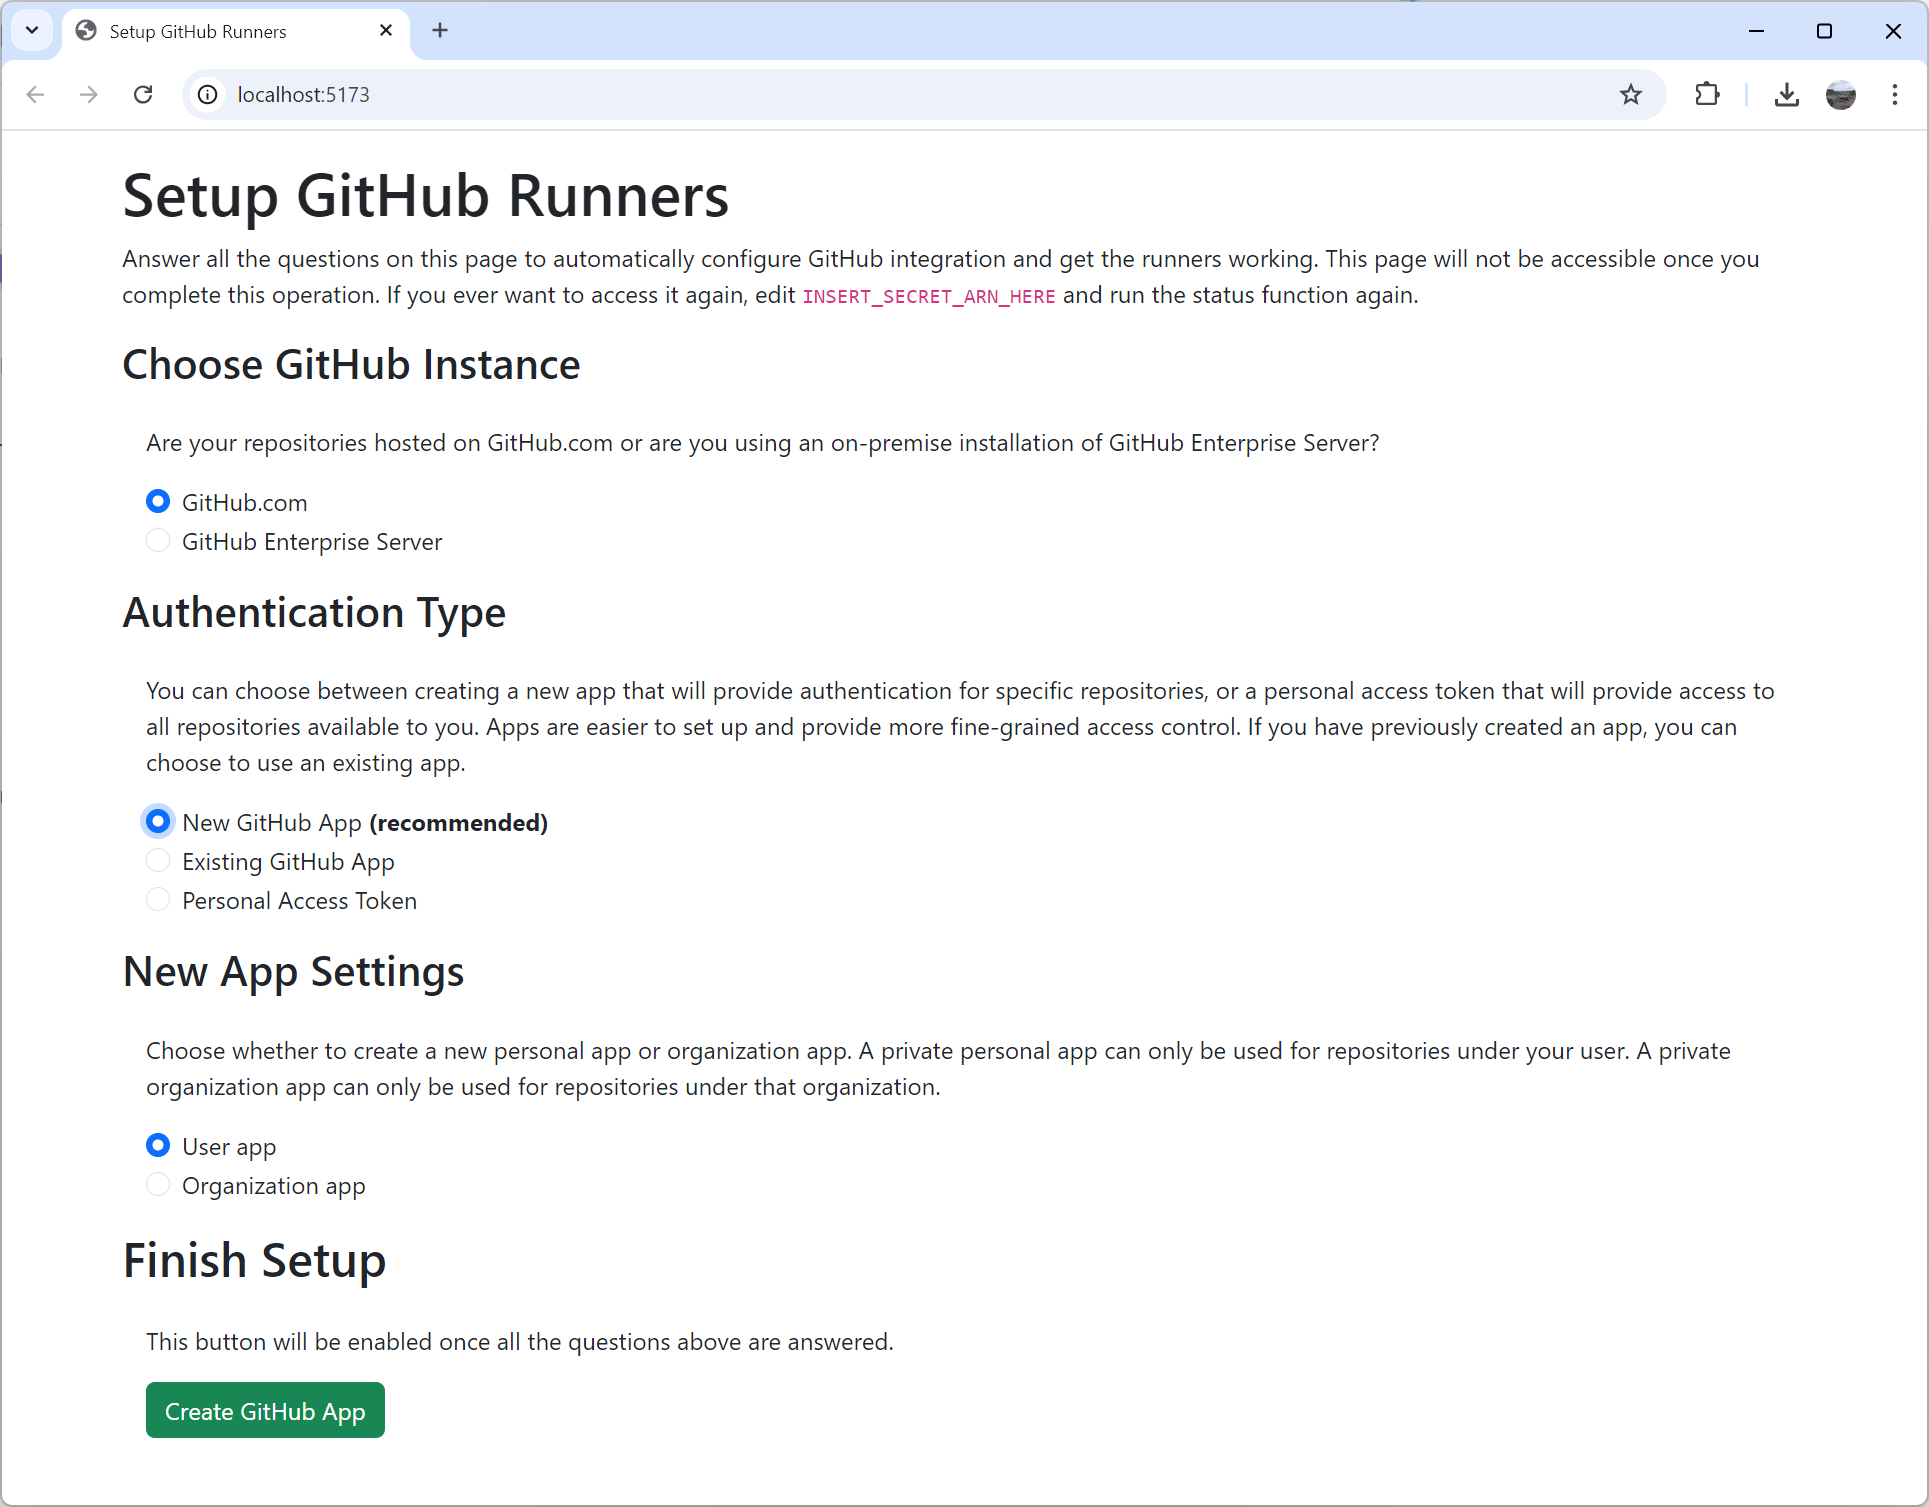
I created cdk-github-runners. I had fun playing with new AWS features, but mostly focused on making it as easy to install as possible. It deploys in a few minutes with the default configuration. After deployment you end up with a fancy browser-based setup wizard. It even uses app manifests to create the GitHub app automatically. This means there is zero room for errors with secrets because you don’t have to copy around multiple random keys and tokens. And then to top it all off, there is a solid API to customize the runner image and add dependencies or configuration. It can create on-demand runners for you on EC2, ECS, Fargate, CodeBuild and even Lambda (because why not?). Runner images are built in AWS itself so you don’t need to wait hours for it to build and upload from your computer. Refreshed images are built on a schedule so you are always up-to-date.
Of all the various open-source tools I’ve worked on over the years, this one has been the most popular so far, second only to NSIS. People want their self-hosted runners. I believe most of the popularity is thanks to Corey Quinn of Last Week in AWS mentioning the tool in his talks. You should hear him talk about it, but I’ll just say he lived up to his name with the architecture of his setup. He even invited me to his podcast to talk about open-source which was a lot of fun.
Turbo-Charging Deployments
No one likes long deployment times. And when working on a laptop, long and resource heavy build processes are even worse. Whenever CDK starts Docker to bundle assets locally, I know it’s time for a coffee break. This is why I created cdk-turbo-layers and used it in every project where Python Lambdas have dependencies. Instead of cooking my poor laptop, it bundles the dependencies in Lambda or CodeBuild on AWS and attaches them as a layer to my functions. The usual CDK process downloads dependencies, installs them, bundles them, and then uploads them right back. But with turbo layers there is no downloading, definitely no uploading, and bundling only happens when dependencies change. Finally CDK only uploads the code itself and absolutely never touches dependencies locally. You can uninstall Docker.
This tool uses the exact same trick I used with Lovage (blog post) and serverless-python-requirements (blog post). While turbo layers got a bit more stars than its ancestors, it’s still not very popular. People really hate layers. And they do have some good reasons. But this tool does the trick for me. I can deploy my projects way faster without Docker cooking my lap.
Just in case you’re curious about the details, all it does is create a custom resource that does the bundling on AWS itself. It creates a Lambda function that runs pip install, zips the result up, uploads it to S3, and returns the hash. A layer is then created based on the result of the custom resource and attached to the function. There is a lot more fluff around it to support different package managers, and provide additional debugging information for the eventual packaging failure. But at the heart of it is just a custom resource call pip install.
Standalone SOCI Indexer for Speed
In the same theme of speeding things up, I have been excited about AWS announcing SOCI support. Lazy loading Docker images for shorter container boot times? Yes please. This is immediately useful in every project I’ve worked on. But while being excited about the technology, I was disappointed to try and fail running it. The basic snapshotter that indexes images so they can use SOCI has some heavy dependencies. I believe it was running containerd on CodeBuild that broke my spirit. I decided to fork their Lambda variant of the snapshotter and create standalone-soci-indexer.
This tool runs anywhere and requires nothing. It doesn’t even require Docker. It can handle arm64 images on x64 and x64 images on arm64. It even almost runs on Windows (gzip binding is missing). It is completely standalone and impossible to install wrong as it’s just one executable. Download it, run it, and you got yourself a SOCI index. Done.
At camelcamelcamel we have been tracking price points of Amazon products for the past 15 years. All this data was saved into one big MySQL table that is now over 1TB in size. We decided to move it to DynamoDB to save on costs, get better performance, and reduce maintenance complexity. Composite keys where the sort key is the timestamp fit perfectly for our use case. All our queries consistently finish in less than 20ms. One of the slowest queries we had on MySQL was querying a specific product by date. In DynamoDB it is consistently fast with the new composite key of product id for primary key and timestamp for sort key. Those queries no longer affect the entire system either.
The move from MySQL to DynamoDB took a couple of months and we have learned a few important lessons along the way. See below for a summary of our lessons.
At camelcamelcamel we use CDK to deploy our infrastructure. We have a bunch of auto-scaling groups (ASG) behind Application Load Balancer (ALB). We recently started noticing an issue where a deployment that results in ASG instances being refreshed would cause a lot of 502 errors for a few minutes during the deployment. This surprised us as we already use health checks, rolling updates and signals as recommended. To get the bottom of it, we built a timeline of the events for one specific group:
[22:50:07] CloudFormation began updating the auto-scaling group
[22:51:37] One old instance is terminated
[22:52:12] A new instance is being launched
[22:54:14] The new instance signals that it’s ready
[22:54:06] The new instance logs show successful health check from ALB
[22:54:15] The second old instance is terminated
[22:54:48] A second new instance is being launched
[22:54:52] ALB logs start showing 502 errors trying to route requests to the second new instance
[22:56:50] The second new instance signals that it’s ready
[22:56:50] No more 502s
What struck us as odd was this only happened on the last instance of each group. ALB waited until the first instances of the group were ready before sending traffic their way. But for the last instance, ALB just started hammering it with traffic immediately after it was launched.
We ended up contacting AWS support to ask why the last instance of our rolling update gets requests before it’s ready. They pointed out that all of our instances were unhealthy at that time and therefore ALB turned fail-open. When all the instances are unhealthy, ALB starts sending all of them requests in the hopes that some can still handle them. The occasional handled request is better than no requests at all being handled.
We looked in CloudWatch as they suggested. The metrics of the target group’s healthy and unhealthy host count show what happened. At 22:54:15 when the second and last old instance was terminated, we got left with one unhealthy instance. At 22:54:48 when the second new instance was launched, we had 2 unhealthy instances. Since both were unhealthy, ALB was operating in fail-open and was sending requests to the first new instance and the second new instance. The first new instance was already ready for the requests, but the second one wasn’t. And so we ended up with 502 errors until the second instance was ready.
But why was the first new instance unhealthy even though it was ready? ALB only treats instances as healthy after a given number of health checks pass. We were using the default CDK target group health check configuration which is 5 consecutive health checks at a 30 seconds interval. That means any instance takes at least 2:30 minutes to be considered healthy after it’s ready. That delay was long enough and our scaling group small enough for the last instance to start-up while all the other new instances are still considered unhealthy.
The root cause of it all seems to be auto-scaling group not waiting for ALB to consider the instance healthy before moving on with the scaling operation that removes the instances that are considered healthy. We expected the recommended CDK ALB/ASG configuration to deal with this, but apparently it doesn’t.
AWS suggested a few possible solutions including adding more instances to the group and using life-cycle hooks. Life-cycle hooks allow us to control when an auto-scaling group instance is considered launched. They will delay the scaling operation until we complete the hook ourselves. So we can complete the hook only after the instance is ready and everything is installed.
A popular use of lifecycle hooks is to control when instances are registered with Elastic Load Balancing. By adding a launch lifecycle hook to your Auto Scaling group, you can ensure that your bootstrap scripts have completed successfully and the applications on the instances are ready to accept traffic before they are registered to the load balancer at the end of the lifecycle hook.
To integrate life-cycle hooks with CDK we added a life-cycle hook to our ASG, a call to aws autoscaling complete-lifecycle-action at the end of our user-data script, and a policy to our role that allows completing the life-cycle action.
Most of the code deals with preventing circular dependencies in CloudFormation. The call itself is a one-liner, but we need to get the ASG name and hook name without depending on the ASG. User-data script goes into the launch configuration and the ASG depends on it. So the user-data script can’t in turn depend on the ASG again.
import aws_cdk as core
import aws_cdk.aws_autoscaling as autoscaling
import aws_cdk.aws_iam as iam


class MyAsgStack(core.Stack):
    def __init__(self, scope: Construct, id_: str, **kwargs) -> None:
        super().__init__(scope, id_, **kwargs)

        asg = autoscaling.AutoScalingGroup(
            self, f"ASG",
            # ...
        )

        # the hook has to be named to avoid circular dependency between the launch config, asg and the hook
        hook_name = "my-lifecycle-hook"

        # don't let instances be added to ALB before they're fully installed.
        # we had cases where the instance would be installed but still unhealthy because it didn't pass enough
        # health checks. if all the instances were like this at once, ALB would turn fail-open and send requests
        # to the last instance of the bunch that was still installing our code.
        # https://console.aws.amazon.com/support/home?#/case/?displayId=9677283431&language=en
        # https://docs.aws.amazon.com/autoscaling/ec2/userguide/lifecycle-hooks.html
        asg.add_lifecycle_hook(
            "LifeCycle Hook",
            lifecycle_transition=autoscaling.LifecycleTransition.INSTANCE_LAUNCHING,
            default_result=autoscaling.DefaultResult.ABANDON,
            lifecycle_hook_name=hook_name,
        )
        asg.add_user_data(
            # get ASG name (we could use core.PhysicalName.GENERATE_IF_NEEDED again, but the ASG already exists)
            f"ASG_NAME=`aws cloudformation describe-stack-resource --region {self.region} "
            f"--stack {core.Aws.STACK_NAME} --logical-resource-id {self.get_logical_id(asg.node.default_child)} "
            f"--query StackResourceDetail.PhysicalResourceId --output text`",
            # get instance id
            "INSTANCE_ID=`ec2-metadata | grep instance-id | head -n 1 | cut -d ' ' -f 2`",
            # complete life-cycle event
            f"aws autoscaling complete-lifecycle-action --lifecycle-action-result CONTINUE "
            f"--instance-id \"$INSTANCE_ID\" "
            f"--lifecycle-hook-name '{hook_name}' "
            f"--auto-scaling-group-name \"$ASG_NAME\" "
            f"--region {core.Aws.REGION}"
        )

        # let instance complete the life-cycle action
        # we don't need cloudformation:DescribeStackResource as CDK already adds that one automatically for the signals
        iam.Policy(
            self,
            "Life-cycle Hook Policy",
            statements=[
                iam.PolicyStatement(
                    actions=["autoscaling:CompleteLifecycleAction"],
                    resources=[asg.auto_scaling_group_arn],
                )
            ],
            roles=[asg.role],
        )
After deploying the code with life-cycle hooks, our new instances won’t even register with the ALB until they’re ready. The health check delay issue still exists so we can still get into fail-open. But at least the new instances that are definitely not ready won’t be sent any requests and the user won’t be getting 502 errors.
One of my clients asked me to implement the solution Clare Liguori of AWS described in Automating safe, hands-off deployments. It’s a very interesting and detailed document describing how Amazon deploys code to production with no human interaction. It describes safe continuous delivery in cloud scale that minimizes developers interaction and failure points. When combined with AWS Well-Architected principals, it shows you the way to build a multi-tenant SaaS product made of multiple services over multiple regions and multiple accounts that follows all best practices, is easy to maintain and easy to develop. AWS provides the principals, but the implementation details vary and depend on the specific product requirements.
In this blog post I will describe how I architected and implemented this solution for one of my clients. They wanted to move their on-premise product to a SaaS offering in the cloud that can scale to millions of transactions a second. A key requirement was being able to easily deploy multiple environments in multiple regions over multiple accounts to accommodate for the security pillar, service limits, and scalability.
If you ever used CDK Pipelines to deploy stacks cross-region, you’ve probably come across support stacks. CodePipeline automatically creates stacks named <PipelineStackName>-support-<region> that contain a bucket and sometimes a key. The buckets these stacks create are used by CodePipeline to replicate artifacts across regions for deployment.
As you add more and more pipelines to your project, the number of these stacks and the buckets they leave behind because they don’t use autoDeleteObjects can get daunting. The artifact bucket for the pipeline itself even has removalPolicy: RemovalPolicy.RETAIN. These stacks are deployed to other regions, so it’s also very easy to forget about them when you delete the pipeline stack. Avoiding these stacks is straightforward, but does take a bit of work and understanding.
If you’re deploying stacks cross-account, set crossAcountKeys: true for the pipeline.
Pass the Pipeline object in CDK CodePipeline’s codePipeline argument.
Here is sample Python code:
try:
    import aws_cdk.core as core  # CDK 1
except ImportError:
    import aws_cdk as core  # CDK 2
from aws_cdk import aws_codepipeline as codepipeline
from aws_cdk import aws_kms as kms
from aws_cdk import aws_s3 as s3
from aws_cdk import pipelines

app = core.App()
pipeline_stack = core.Stack(app, "pipeline-stack")
pipeline = codepipeline.Pipeline(
    pipeline_stack,
    "Pipeline",
    cross_region_replication_buckets={
        region: s3.Bucket.from_bucket_attributes(
            pipeline_stack,
            f"Bucket {region}",
            bucket_name="insert bucket name here",
            encryption_key=kms.Key.from_key_arn(
                pipeline_stack,
                f"Key {region}",
                key_arn="insert key arn here",
            )
        )
        for region in ["us-east-1", "us-west-1", "eu-west-1"]
    },
    cross_account_keys=True,
    restart_execution_on_update=True,
)
cdk_pipeline = pipelines.CodePipeline(
    pipeline_stack,
    "CDK Pipeline",
    code_pipeline=pipeline,
    # ... other settings here ...
)
Tying it Together
The missing piece from the pipeline code above is how it gets the bucket and key names. That depends on how your code is laid out. If everything is in one project, you can create the support stacks in that same project and access the objects in them. That’s what PhysicalName.GENERATE_IF_NEEDED is for.
If the project that creates the buckets is separate from the pipeline project, or if there are many different pipeline projects, you can write the bucket and key names into a central location. For example, it can be written into SSM parameter. Or if your project is small enough, you can even hardcode them.
Another option to try out is cdk-remote-stack that lets you easily “import” values from the support stacks you created even though they are in a different region.
Conclusion
CDK makes life easy by creating CodePipeline replications buckets for you using support stacks. But sometimes it’s better to do things yourself to get a less cluttered CloudFormation and S3 resource list. Avoid the mess by creating the replication buckets yourself and reuse them with every pipeline.
A few months ago I released Lovage. It’s a Python only serverless library that’s focused more on RPC and less on HTTP and events. One of my favorite features was the simple dependency management. All external dependencies are handled in a serverless fashion. Other frameworks/libraries locally download all the dependencies (which often requires cross downloading/compiling with Docker), package them up, and then upload them with every code change. Lovage does this all in a Lambda function and stores the dependencies in a Lambda layer. It saves a lot of time, especially for minor code changes that don’t update dependencies.
Recently I needed to create some smaller serverless projects that do use events and HTTP. I turned back to Serverless Framework. But instead of using the good old serverles-python-requirements, I decided to create serverless-pydeps. It’s another Serverless Framework plug-in that handles Python dependencies the same way as Lovage. By not handling dependency collection locally, it gains the same speed advantages as Lovage.
If you want to use it yourself, run the following command. No further configuration is needed.
sls plugin install -n serverless-pydeps
Even with a large requirements.txt file, the upload is still tiny and deployment is quick.
A lot of Docker images, like nginx, support configuration using files. The documentation recommends that you create the file locally and then mount it to your container with -v /host/path/nginx.conf:/etc/nginx/nginx.conf:ro. Other images, like grafana and redis, support similar configuration methods.
But this method doesn’t work on Fargate because the server running your containers doesn’t have access to your local files. So how can you mount configuration files into containers in Fargate?
One option is baking the configuration file into your image. The downside is that this requires building, storing, and maintaining your own image. It also makes changing your configuration much more difficult.
A simpler method is using a sidecar container that writes the configuration to a volume shared by both containers. The sidecar container uses images like bash or amazon/aws-cli. It can read the configuration from an environment variable, from SSM or even S3.
To add a sidecar container to your existing task definition:
Define a transient volume. When doing this in Fargate Console select Bind Mount type.
Add a new sidebar container definition to your task. Use bash or amazon/aws-cli as the image.
Mount the new volume into your new sidecar container.
Update the command of sidecar container to read the configuration and write it to the mounting point.
Update your existing container definition to also mount the same volume to where the image is expecting the configuration file.
Set your existing container to depend on the new sidecar container to avoid any race conditions.
For example, if we want to configure nginx container using the following configuration file, we can use bash to write it to /etc/nginx/nginx.conf. To avoid any issues with newlines, we will base64 encode the configuration file and put it in the environment of the sidecar container.
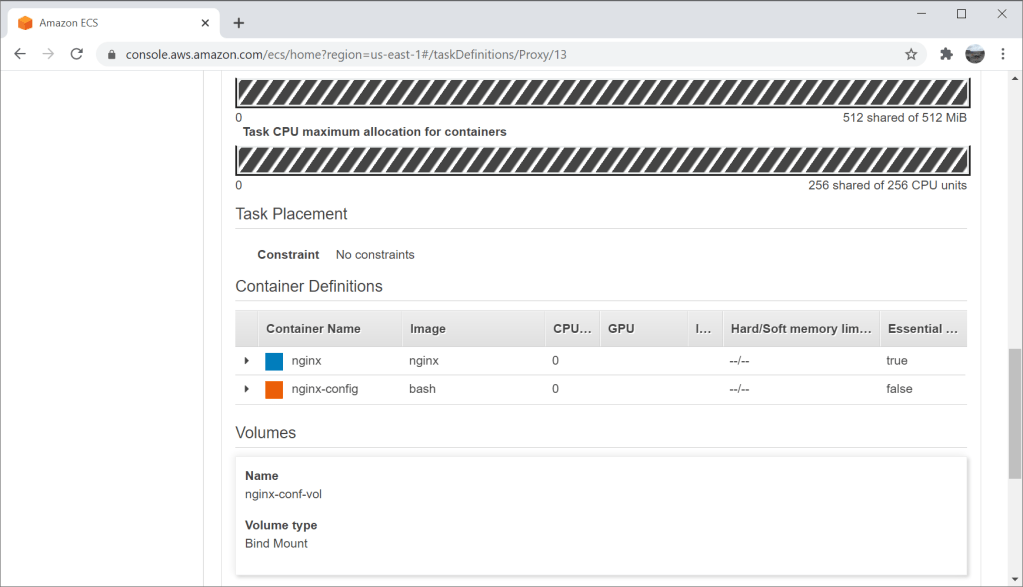
All this takes just a few lines with CloudFormation but can be done using other APIs as well. As you can see, this template defines a task definition with two containers. One container is nginx itself, and the other is the sidecar container. Both of them mount the same volume. The main container depends on the sidecar container. The sidecar container takes the configuration from the environment, decodes it using base64 and writes it to /etc/nginx/nginx.conf. Since both containers use the same volume, the main container will see and use this configuration file.
After deploying this template, you can launch a Fargate task and the result will be a simple web server proxying all requests back to this blog.
This is a very raw example. You would usually want to enable logs, and get configuration from somewhere dynamic in production. But it shows the basics of this sidecar method and can be applied to any Docker image that requires mounting a configuration file.
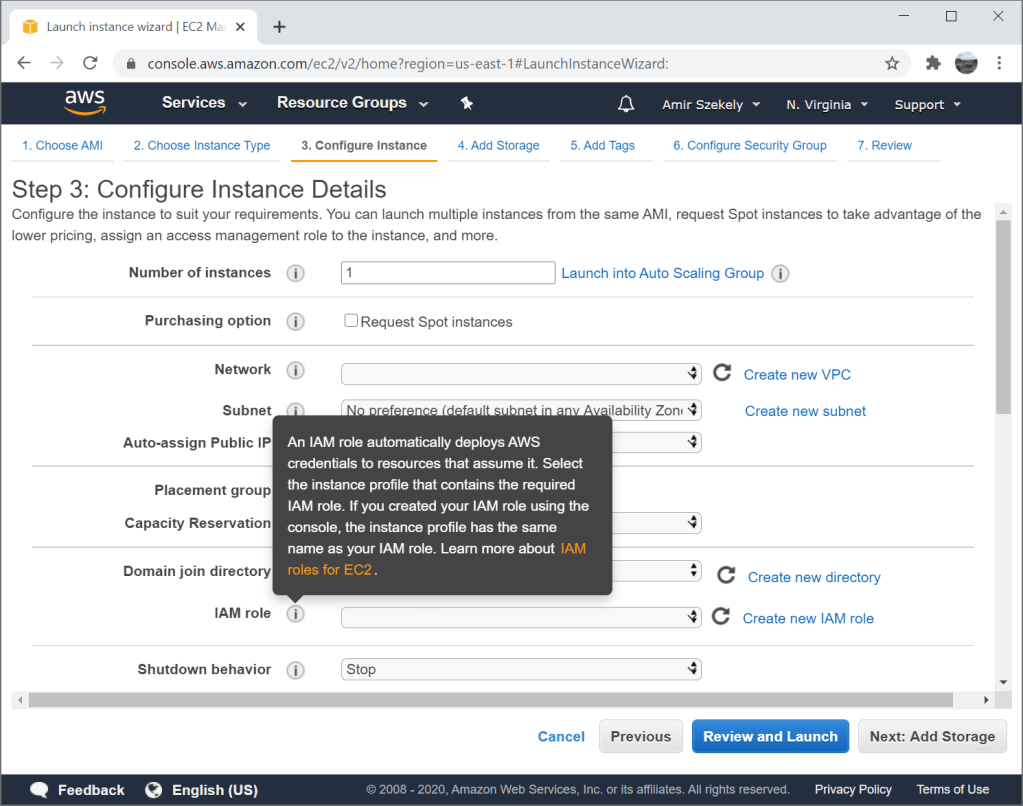
EC2 instance profiles allow you to attach an IAM role to an EC2 instance. This allows any application running on the instance to access certain resources defined in the role policies. Instance profiles are usually recommended over configuring a static access key as they are considered more secure and easier to maintain.
Instance profiles do not require users to deal with access keys. There is one less secret to securely store and one less secret that can leak.
Instance profiles can be replaced or removed using EC2 API or in EC2 Console. There is no need to make your application configuration dynamic to change or revoke permissions.
Instance profiles, and roles in general, provide temporary credentials per-use. If those credentials leak, the damage is contained to their lifespan.
But how does an application running on EC2 use this instance profile? Where do the credentials come from? How does this work without any application configuration change?
EC2 shares the credentials with the application through the metadata service. Each instance can access this service through http://169.254.169.254 (unless disabled) and EC2 will expose instance-specific information there. The exposed information includes AMI id, user-data, instance id and IPs, and more.
The instance profile credentials are exposed on http://169.254.169.254/latest/meta-data/iam/security-credentials/. When you curl this URL on an EC2 instance, you will get the name of the instance profile attached to the instance. When you curl the same URL with the instance profile name at the end, you get the temporary credentials as JSON. The metadata service will return access key id, secret access key, a token, and the expiration date of the temporary credentials. Behind the scenes it is using STS AssumeRole.
All this data can be used to configure any application to use the role attached to the instance profile. You just have to be careful not to use it past the expiration date. You must also remember to check for new temporary credentials once the expiration date passes. If you are going to use these credentials manually, remember that the token is required. Normal user access keys don’t have a token, but temporary credentials require it.
To save you on curl calls and to automate this process further, all AWS SDKs check the instance profile for credentials first. As you can see in the source code, this is exactly what the Python SDK, botocore, does to get credentials from the instance profile. In the end, everything just works as expected, and no application configuration is required.